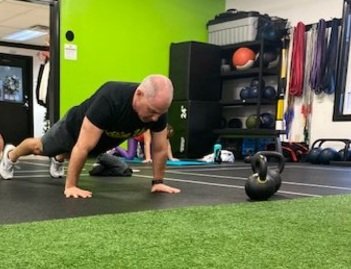
PUSH-UPS
Push-ups: known for being one of THE BEST bodyweight exercises for building upper body strength. Not only do you get stronger, you improve your muscle, joint, ligament, and bone health along the way. All good things if you enjoy moving well and living pain free!
Like all other movements in our How To Guide blog series, the push-up is equally as effective as it is efficient and functional! Though considered one of the most common strength training exercises, there is nothing easy about this simple, foundational movement pattern:
-
Effective: The push-up is a compound exercise engaging multiple muscles group all at once (mainly the core, arms and chest); giving you everything you need to sculpt your back muscles, work your shoulders, improve your posture and look super bada$$!
-
Efficient: You can do push-ups anytime, anywhere. No equipment required or needed. It’s both portable and suitable for beginners and advanced exercise enthusiasts.
-
Functional: Improve your posture while protecting your shoulders and low back from injury. Years spent hunched over the computer and nowadays, smart phones, equates to really bad posture with shoulders rounding forward and weakening back muscles. Push-ups work the muscles responsible for keeping you upright, your shoulders pinned back and your posture perfect!
Although the push-up is a mechanically simple exercise, it can open the door for injury to the shoulders, back and neck IF done incorrectly. Like all exercises, it’s crucial to first, understand and master proper technique and form before executing the full move.
It’s time to learn the proper way to perform the perfect push-up for YOU considering your fitness level to build strength, enhance basic, daily movement patterns and live healthy, happy and strong. This blog is teaching you:
-
4 Reasons to Master Push Ups
-
5 Common Mistakes to Avoid
-
Step by Step Guide to Get Started
4 REASONS TO MASTER PUSH-UPS
-
Total Body Exercise: You may think push-ups are only an arm, shoulder and chest exercise. However, when done correctly, the push-up requires the use of your core, back and legs, making it a total body strengthener. Because push-up strengthen your stabilizing muscles along the spine and core, this exercise translates into making life easier when performing daily activities: carrying that load of laundry, picking up your toddler from their nap, lifting the dog off the floor, or picking up fall leaves. It’s true! You have push-ups to thank for effortlessly carrying groceries in one trip 😊.
-
Equal-Opportunity Exercise: Some variation of a push-up can be done by ANYONE, regardless of fitness level, making this an equal opportunity exercise. This means if you are without injury, you can absolutely learn and perform push-ups. *Note: If you have a shoulder, core or chest injury, consult your physician first.
-
No Equipment Needed: No fancy gym equipment is necessary to perform a push-up, just some floor space. If you are a beginner and need a modified version, you can use a stabilized household object such as a kitchen counter or coffee table. By raising the “floor” closer to your chest, you can focus first on activating the right muscles and perfecting your form.
-
Injury Prevention: Working the stabilizer muscles around the shoulder protects you from future rotator cuff injuries.
5 MISTAKES TO AVOID
Performing the perfect push-up takes patience and time. Your first priority is mastering the movement by learning proper technique and form. This allows you to build proper strength, activate the right muscles and get to where you want to be (doing a push-up!) injury and pain free. If you find yourself getting tried or unable to complete the full movement, switch to a modified version as you build more strength. Here are key mistakes to avoid:
-
Butt & Hips Sag: During a push-up, you want to keep your body parallel to the floor. However, one of the biggest mistakes is letting your butt and hips droop down and sag. This indicates your core is not engaged and / or not (yet) strong enough to hold your bodyweight and maintain that parallel position.
The Fix: To activate and build more core strength, start by engaging your core by squeezing your abs and butt. Instead of going straight to a regular push-up on the ground, opt for a modified, inclined push-up that raises the ground up to you. If you have access to a gym, raise the ground and do your push-up from a barbell fixed on a squat rack, or from box or bench. If practicing your push-up at home, use your kitchen counter or a stable coffee table.
-
Poor Alignment: It’s very common to see the chin / head initiate the gradual lowering towards the floor. In this instance, the neck and chin are darting out and the spine is no longer in proper alignment: a straight line from head to toe. Leading with your chin or head causes your upper body to round forward and puts undue stress on the neck and shoulders.
The Fix: When performing a push-up, maintain a straight line from head to toe by keeping your eyes looking down towards the floor, and the top of your head pointed away from your feet. Before starting, make a double chin and as you lower your body, lead with your chest (your chest should reach the ground first). This ensures your upper body moves up and down in unison while maintaining that straight line.
-
Hands Too Wide / Narrow: Are your hands placed too far outside your chest or, too close together? This causes unnecessary tension on your elbows and shoulders leading to pain and potential injury.
The Fix: When performing a push-up, your hands should be placed just outside your chest, slightly wider than shoulder width apart, with shoulders over wrists.
-
Elbows Flare: If you’re elbows are flaring, ouch! Elbow flaring happens when your elbows are perpendicular to your body and bent at a 90-degree angle. Again, this is going to eventually start hurting and is not good for your joints and elbow health!
The Fix: Once you’ve correctly positioned your hands, elbow placement is equally important! As you bend and straighten your elbows, think about keeping your elbows by your side at a 45-degree angle with your hands just outside your chest, slightly wider than shoulder width apart. This allows plenty of space for your chest to lower down.
-
Limited Range of Motion: If you find you’re only able to go partially down during a push-up, you’re not moving through the full range of motion of your muscles and joints and even worse? You are NOT reaping the glorious benefits of the exercise.
The Fix: To get the most bang for your buck, switch to that modified, inclined push-up allowing you to fully lower and raise your body. Range of motion is more important and more effective than attempting a partial or half push-up on the ground.
STEPS TO GET STARTED: REGULAR PUSH-UPS
Remember, doing the “perfect” push-up takes patience, time, and practice. Be willing to fail and/or try modifications to master form and get to where you want to be!
-
Starting Position: Start by getting down on the ground in an all-fours position. Place your hands just outside your chest, slightly wider than shoulder width apart. This hand position provides space for your chest and shoulders to move with ease.
-
Get into a plank position: Extend your legs out behind you with heels off ground balancing on your toes. Keep your arms straight but do NOT lock your elbows.
-
Activate your core: To engage your core, think about squeezing your abs and your butt as your push your body away from the ground/bar/bench/counter.
-
Head/Spine Position: Make a double chin to prevent your chin from darting out. Check that your body remains in that plank position: a straight line from head to toe.
-
Elbow Check: Keeping your elbows by your side at a 45-degree angle, bend at your elbows as you begin lowering your body down, remembering to lead with your chest.
-
Lowering Down: Lower your chest so it almost touches the ground while keeping your head and neck neutral in that straight line. Once your chest is lowered, hold that position by pausing for 1-2 seconds.
-
Pushing Up: Push down into the ground evenly with both hands while straightening your elbows as you raise your body up (avoid locking your elbows). Remember, your body should move in unison meaning your butt, hips and shoulders stay in that straight line as you return to your starting plank position.
-
Return to the starting position and repeat.
STEPS TO GET STARTED: MODIFIED PUSH-UPS
Okay, maybe you’ve attempted the regular push-up but it’s not going well (yet). You are feeling the push-ups in your back, your hips are sagging, and you can’t get the full range of motion. Have no fear! Below are modified versions so you can practice like a pro and get to that regular push-up! Modified push-ups bring the ground up meaning less bodyweight to lower/raise and a better range of motion. Try any one of the following variations to get started:
1. Wall Push-Up: The wall push-up is the easiest modification and an ideal starting point. To perform a wall push-up, start by standing a few feet away from the wall (the further away you stand, the more challenging it will become). Follow the same instructions as above.
2. Incline Push-Up: Once you’ve mastered the wall push-up, next is the incline push-up. While this version still brings the ground up to you, it allows you to gradually increase range of motion and move closer to the ground. To get started, placing your hands on the elevated surface and follow the same instructions as above.
3. Knee Push-Up: When your incline push-up is on point, it’s time for the knee push up. This modified push-up brings you closer to the ground but offers more support than a regular push-up because your knees are on the ground, and you are pushing less bodyweight. Follow the same instructions as above but with your knees on the ground.
As you start out, try all the above modifications and challenge yourself to advance to the next modification as you feel your strength and range of motion improving, eventually making your way to the full pushup.
If you have questions about how to do push-ups or just want to understand more about this movement, click the button now to schedule your free Strategy Session with an RF Coach!

Keep living healthy, happy + strong!